# Docker Deployment
Note: If you want to deploy to Heroku, please check Deploy to Heroku
# Target Audience
The target audience for this document is: developers and implementers of this system, and developers who want to try our services locally.
# Prerequisites
Linux / MacOS / WSL that supports docker and docker compose
TIP
currently native Windows is not supported, additional configuration may be required. Please contact us (opens new window) through the community for Windows support, we are happy to help.
Contact us through the community (opens new window) to get permission to access the repo for platform one-click run configuration, and have a working GitHub SSH key configuration (opens new window)
warning
If you don't have permission to access our repo, the following commands won't execute successfully
# Installation
Execute the following command to install the integrated platform:
curl -s https://www.muyan.io/muyan.sh | bash
The integrated installer includes the following components and tools:
- The latest version of Muyan platform frontend from https://hub.docker.com/r/muyantech/frontend (opens new window)
- The latest version of Muyan platform backend
- The latest version of Redis
- PostgreSQL version 15.7
- The latest version of PGAdmin container for PostgreSQL management
You can view the script content to understand what it does.
Here's a basic overview of the installation process:
- Clone the platform repository to the
./platformfolder - Run Docker Compose to start all containers
# System Update
# Update to latest versions
# Run the following command directly in the directory containing the docker-compose.yml file
docker-compose down && docker-compose pull && docker-compose up -d
2
# Update workspace
# Run the following command directly in the directory containing the docker-compose.yml file
# If local files have been modified, please backup this directory first to avoid overwriting your work
git stash && git pull && git stash apply
2
3
# Installation and Update Video
The following is a video demonstration of the installation and upgrade process under wsl2 for your reference. The installation process on Linux and MacOS is similar.
The commands entered in the video can be referenced in the code below
# Confirm that docker and docker compose commands can be executed normally
docker --version
docker compose --version

# Install the docker images for the platform frontend, backend, and dependent services and start them
# Depending on network connection and computer hardware configuration, it may take 10 minutes or even longer
curl -s https://www.muyan.io/muyan.sh | bash

# Update frontend and backend versions
# By default, it will be installed in the platform directory
cd platform
# Pull the latest frontend and backend Docker images and restart all services
# Depending on network connection speed, it may take 10 minutes or even longer
docker compose pull;docker compose down;docker compose up -d
2
3
4
5
6
7
8
9
10
11
12
13
14
# Access
# Local access
Please access the frontend through http://localhost:3000 (opens new window). It will automatically connect to the backend running at http://localhost:8080 (opens new window).
# LAN access
The system enables LAN access by default. You can access the system through the
LAN IP address, for example: http://192.168.0.2:3000, without additional
configuration.
# Development
# Frontend
Our low-code platform uses a unified frontend, so you don't need to develop it yourself.
For any new frontend component requirements, please submit a feature request here (opens new window).
# Backend
For detailed guidance on backend development, please refer to the Chinese documentation.
The development documentation is currently being translated into English.
# Start Developing
Congratulations on successfully installing the platform! Here's how to start developing and make the most of your new setup.
# Navigate to Project Directory
Open a terminal and run: cd platform
# Explore the Project Structure
Take some time to familiarize yourself with the layout of project directories and files. The overall development environment directory structure and its explanation are as follows:
.
├── db-seed-data                                       # Database seed data directory
│   └── initdb                                         # Database initialization scripts
│       ├── restore-dump.sh                            # Shell script to restore database dump
│       └── seed-data.dump                             # Database dump file for seeding initial data
├── docker-compose.yml                                 # Docker Compose configuration file for containerization
├── muyan.sh                                           # One-click installation script for the platform
├── runtime                                            # Runtime-related directories and files
│   ├── attachments                                    # Storage for user-uploaded attachments, mapped to /app/attachments in Docker
│   ├── database                                       # Database-related files and directories
│   │   ├── data                                       # PostgreSQL database data files
│   │   └── pgadmin                                    # PostgreSQL admin tool configuration (from template repo)
│   │       ├── config                                 # PgAdmin configuration files
│   │       │   └── servers.json                       # PgAdmin server configurations
│   │       └── pgpass                                 # PostgreSQL password config for PgAdmin
│   └── pgadmin                                        # Runtime generated PgAdmin configs (not in git repo)
│       ├── config                                     # Runtime PgAdmin configuration
│       ├── data                                       # Runtime PgAdmin data storage
│       │   ├── azurecredentialcache                   # Azure credential cache for cloud deployments
│       │   ├── pgadmin4.db                            # PgAdmin database file
│       │   ├── sessions                               # Session data storage
│       │   └── storage                                # General storage for PgAdmin
│       │       └── db_muyan.cloud                     # Specific database storage
│       │           └── pgpass                         # PostgreSQL password config for PgAdmin
│       ├── log                                        # PgAdmin log files
│       └── pgpass                                     # Another PostgreSQL password config for PgAdmin
├── server                                             # Server-side application code, mapped to /app/plugin in Docker
│   ├── build.gradle                                   # Gradle build configuration for the server
│   ├── data                                           # Runtime seed data folder, mapped to /app/plugin/data in Docker
│   │   ├── attachments                                # Server-specific attachment files
│   │   ├── css                                        # CSS style files
│   │   ├── groovy                                     # Groovy scripts (possibly for server-side logic)
│   │   └── production                                 # Production data and configurations
│   │       ├── muyan                                  # Default tenant name
│   │       │   └── [Various CSV files]                # CSV files for different domain models and configurations
│   │       └── Organization.csv                       # Tenant-defined root organization config
│   ├── gradle                                         # Gradle wrapper files
│   │   └── wrapper
│   │       ├── gradle-wrapper.jar                     # Gradle wrapper JAR
│   │       └── gradle-wrapper.properties              # Gradle wrapper properties
│   ├── gradlew                                        # Gradle wrapper script for Unix-like systems
│   ├── gradlew.bat                                    # Gradle wrapper script for Windows
│   ├── plugin                                         # Plugin-related files and directories
│   │   ├── build.gradle                               # Gradle build configuration for plugins
│   │   └── src                                        # Plugin source code
│   │       └── main
│   │           └── java
│   │               └── tech
│   │                   └── muyan
│   │                       └── plugin
│   │                           └── PluginExample.java # Example plugin implementation
│   └── settings.gradle                                # Gradle settings for the server project
└── token.txt                                          # File containing token to access Docker image
2
3
4
5
6
7
8
9
10
11
12
13
14
15
16
17
18
19
20
21
22
23
24
25
26
27
28
29
30
31
32
33
34
35
36
37
38
39
40
41
42
43
44
45
46
47
48
49
50
51
52
53
# Start Coding
Everything is ready, all that's left is to apply it. Start developing your application now! Here are some simple documentation sections:
- You can follow us to build a simple CRM system from scratch
- If you want to start system design, you can refer to the System Design Guide
- If you want to define the system's domain model, forms, actions, etc., you can refer to Data Import and CSV File Templates
- If you want to develop plugins, you can refer to Plugin Development
# Manage Your Application
To manage the lifecycle of your application, use the following commands in the
platform directory:
# Start the application
docker compose up -d

# Stop the application
docker compose down
2
3
4
5
# Upgrade to New Version
When Muyan Low-Code Platform releases a new version, you just need to execute
the following commands in your workspace (the directory containing the
docker-compose.yml file) to upgrade the platform version in your local
workspace.
# Pull the latest images from docker hub
docker compose pull

# Restart the running backend container
docker compose up -d
2
3
4
5
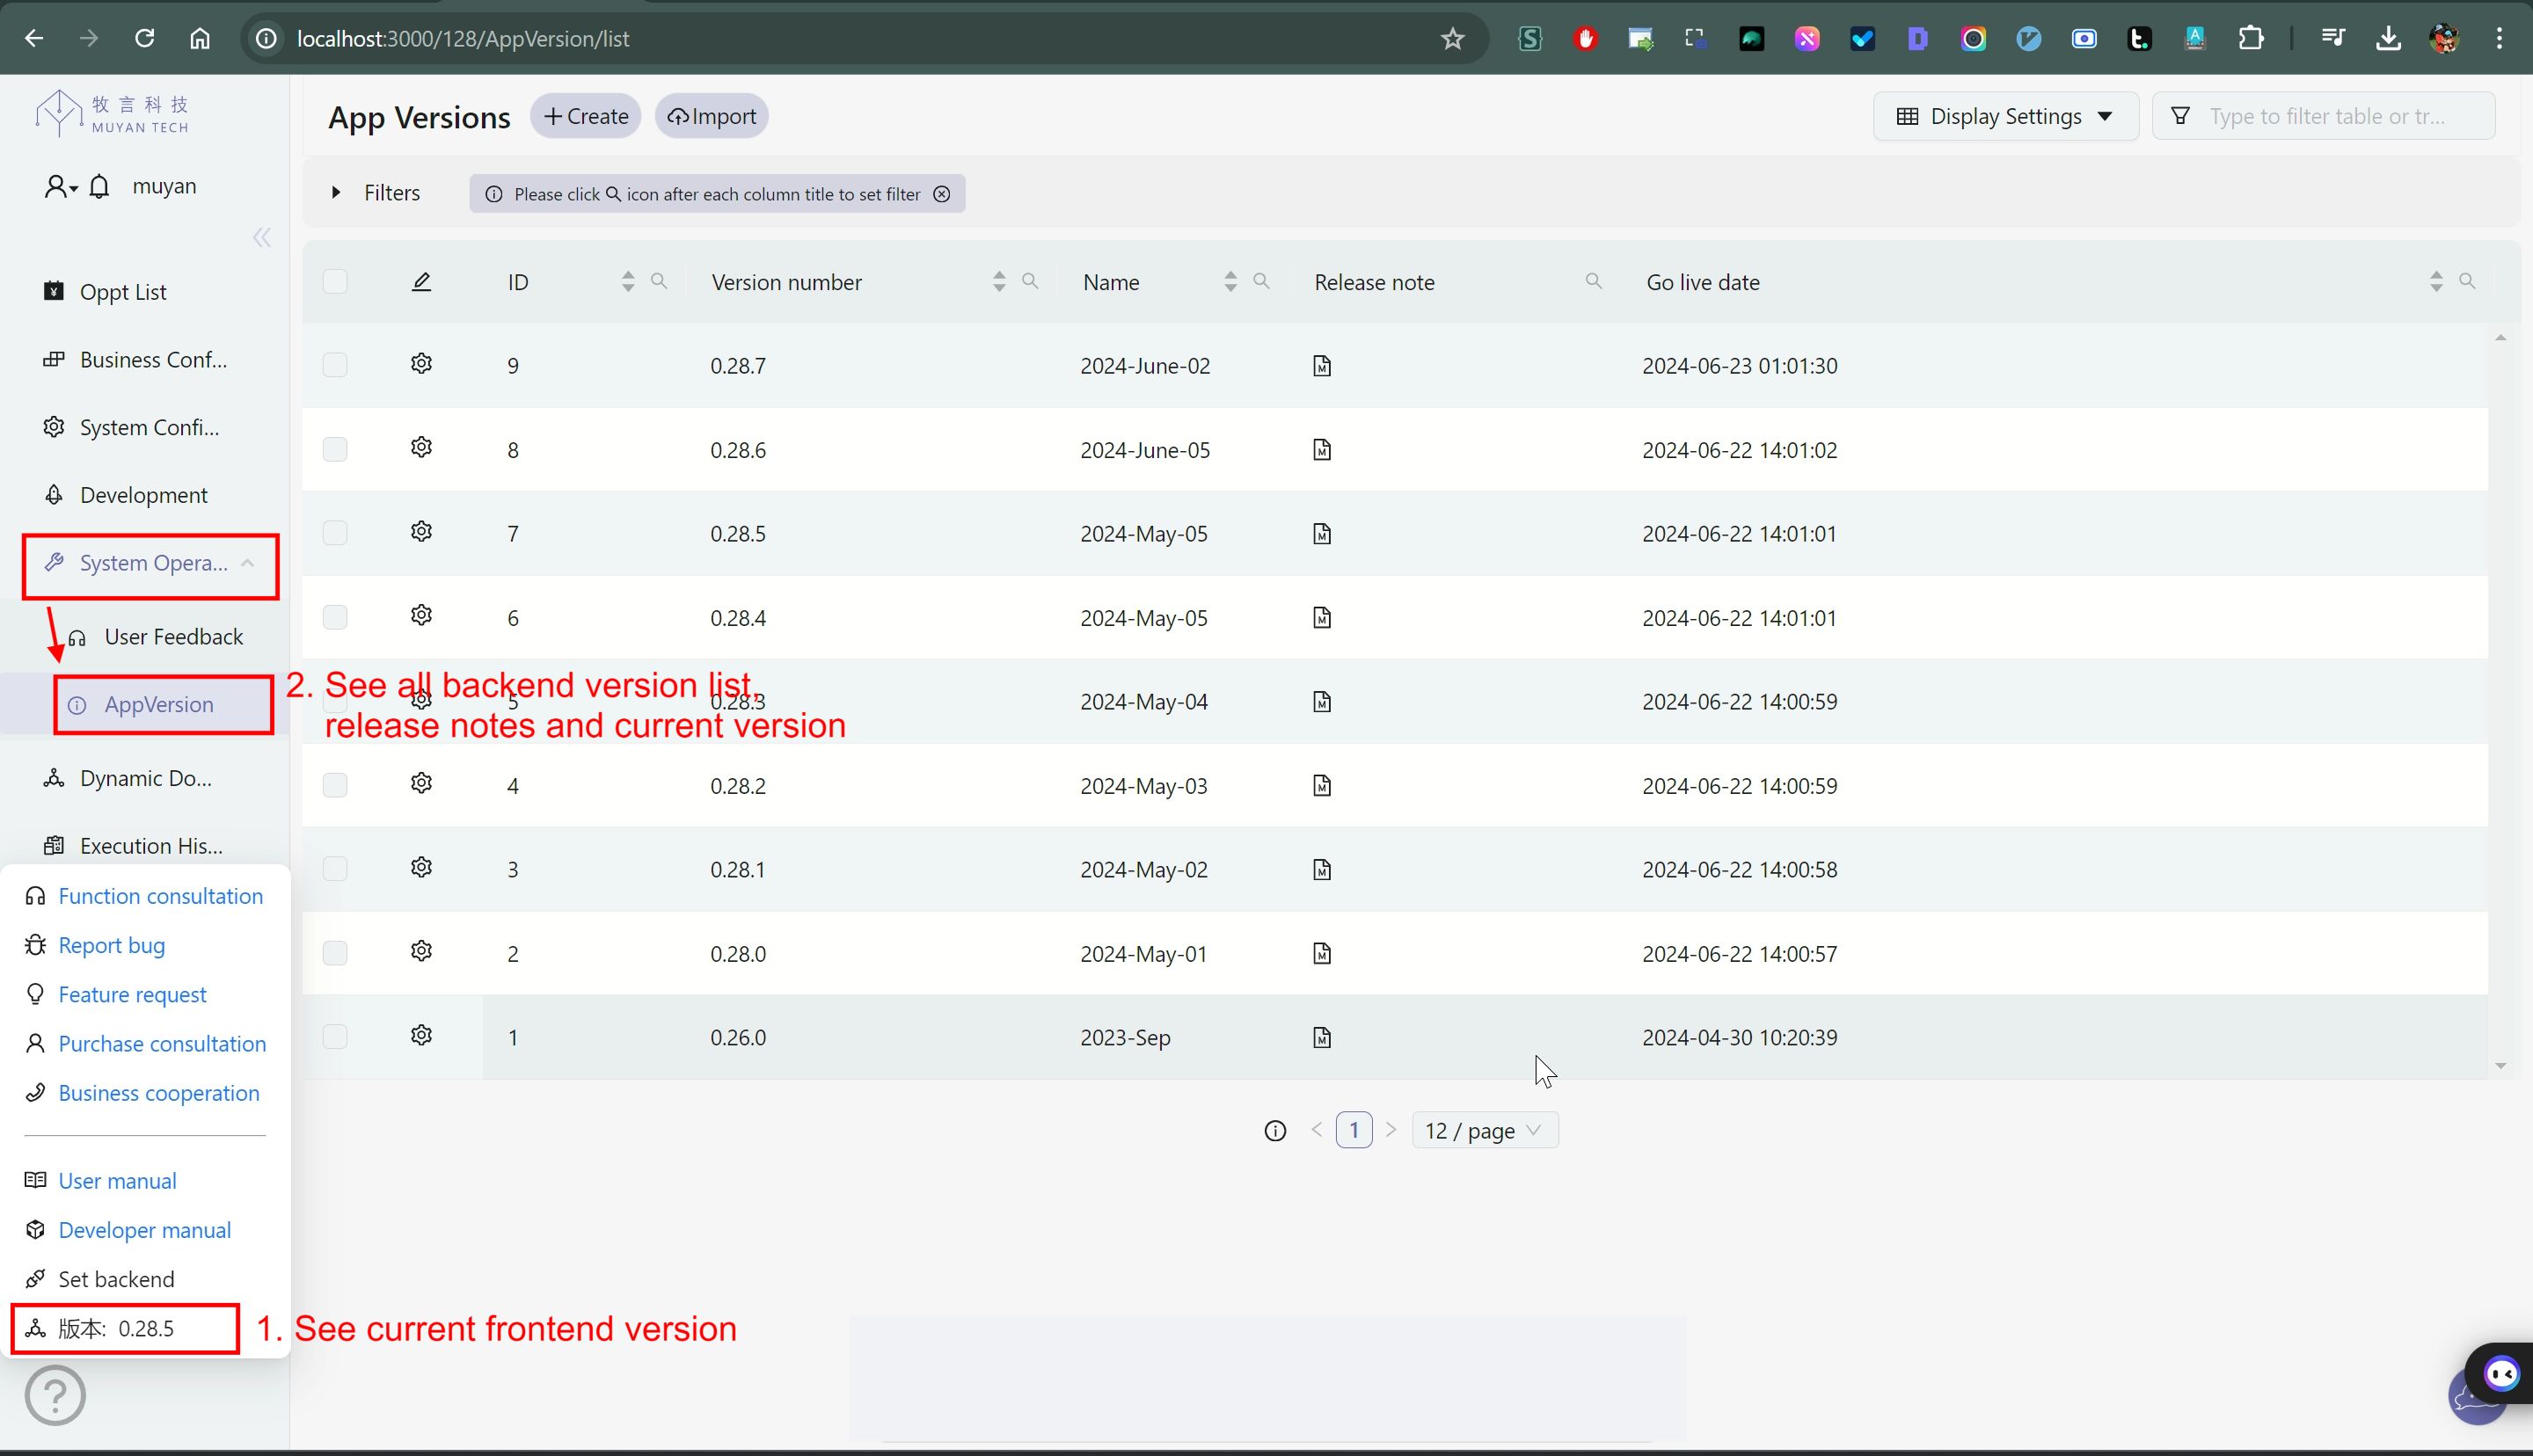
After upgrading, you can refer to the following image to confirm the current running versions of the frontend and backend
# Related Configuration
# Changing the Default Tenant
Tenant is an important configuration in the system. It serves two primary purposes:
- It acts as the prefix for domain class tables in the database.
- It is used as the tenant column value for all records saved in the database.
To change the default tenant, follow these steps:
# 1. Update the Configuration
Change the TENANT_ID environment variable or modify the docker-compose.yml
file(not recommended):
Set the
TENANT_IDenvironment variable:- For Unix-like systems (Linux, macOS):
export TENANT_ID=your_new_tenant_id1 - For Windows:
set TENANT_ID=your_new_tenant_id1
- For Unix-like systems (Linux, macOS):
Or modify the docker-compose.yml file directly(not recommended):
- TENANT_ID=${TENANT_ID:your_new_tenant_id}1
2
# 2. Update File Structure
Rename the tenant-specific data directory:
mv server/data/production/muyan server/data/production/your_new_tenant_id
# 3. Modify Bootstrap Organization
Edit the server/data/production/Organization.csv file. Change the tenant and
subDomain fields to match your new tenant ID. For example:
Original content:
name,parent.name,customiseEnable,tenant,subDomain(*)
muyan,NULL,Y,muyan,muyan
2
Modified content:
name,parent.name,customiseEnable,tenant,subDomain(*)
your_organization_name,NULL,Y,your_new_tenant_id,your_new_tenant_id
2
# 4. Restart the System
After making these changes, restart your system. This will trigger the process of reimporting all seed data with the new tenant ID.
# Important Considerations
Changing the default tenant will affect all new database operations and existing data.
Remember to restart your application after making these changes to ensure the new configuration takes effect and to initiate the seed data reimport process.
# Enable OpenAI Interface
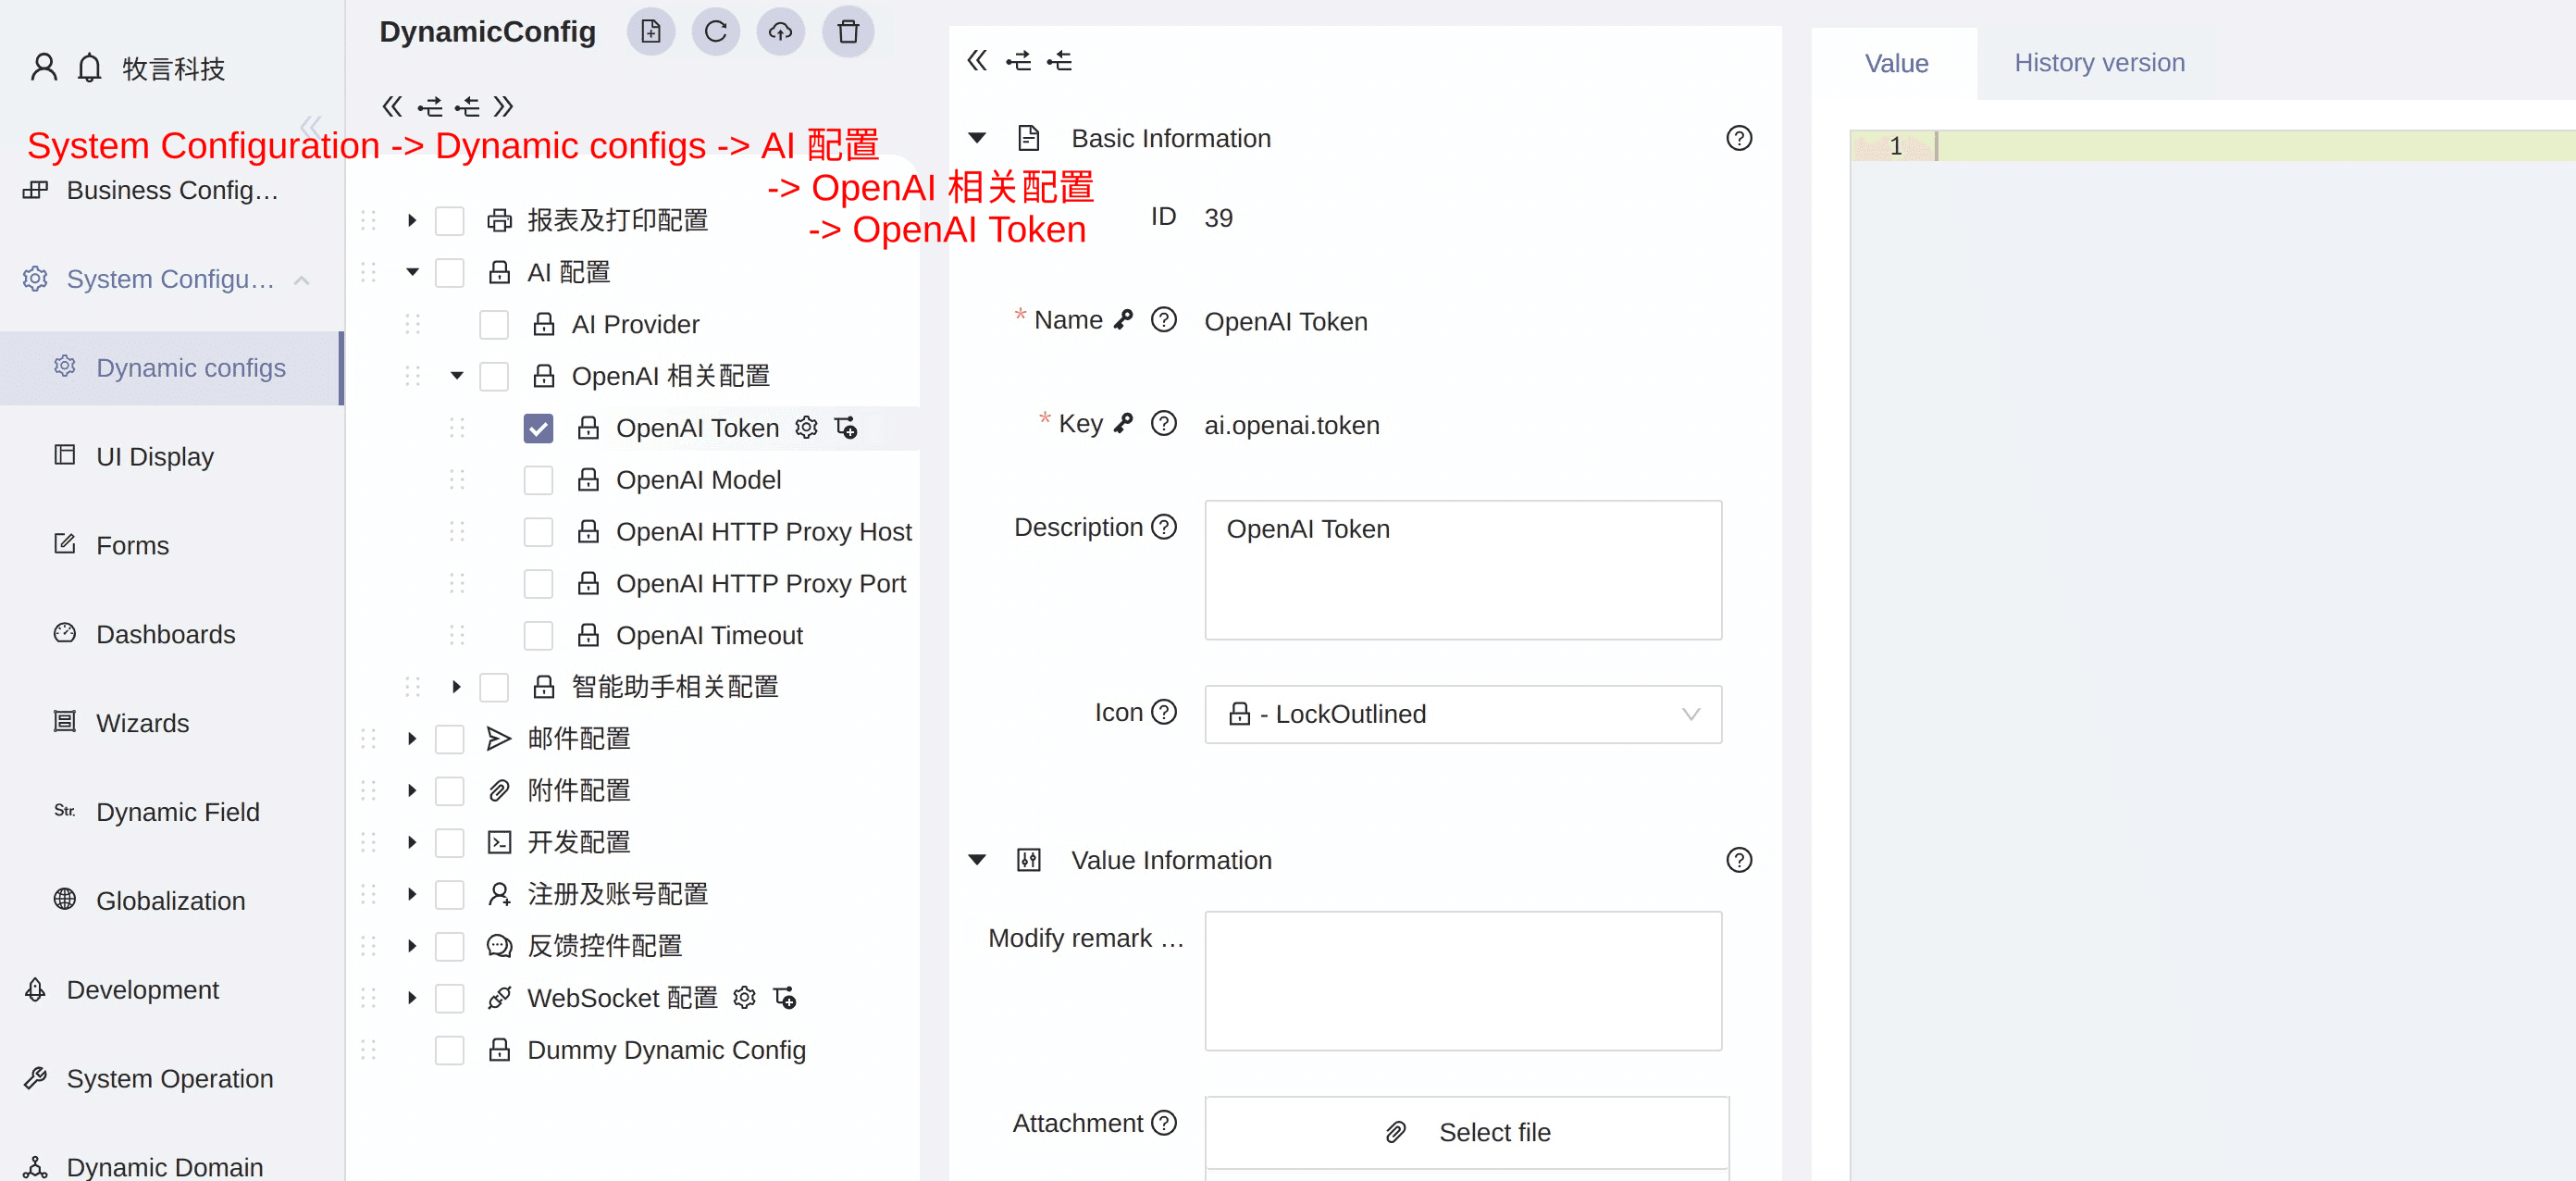
If you want to enable AI features, please refer to the screenshot below to understand how to set up the OpenAI token
The following is an explanation of enabling the OpenAI interface to activate the intelligent assistant and the LLM_ENGINE logic engine
# Enable Anthropic API Interface
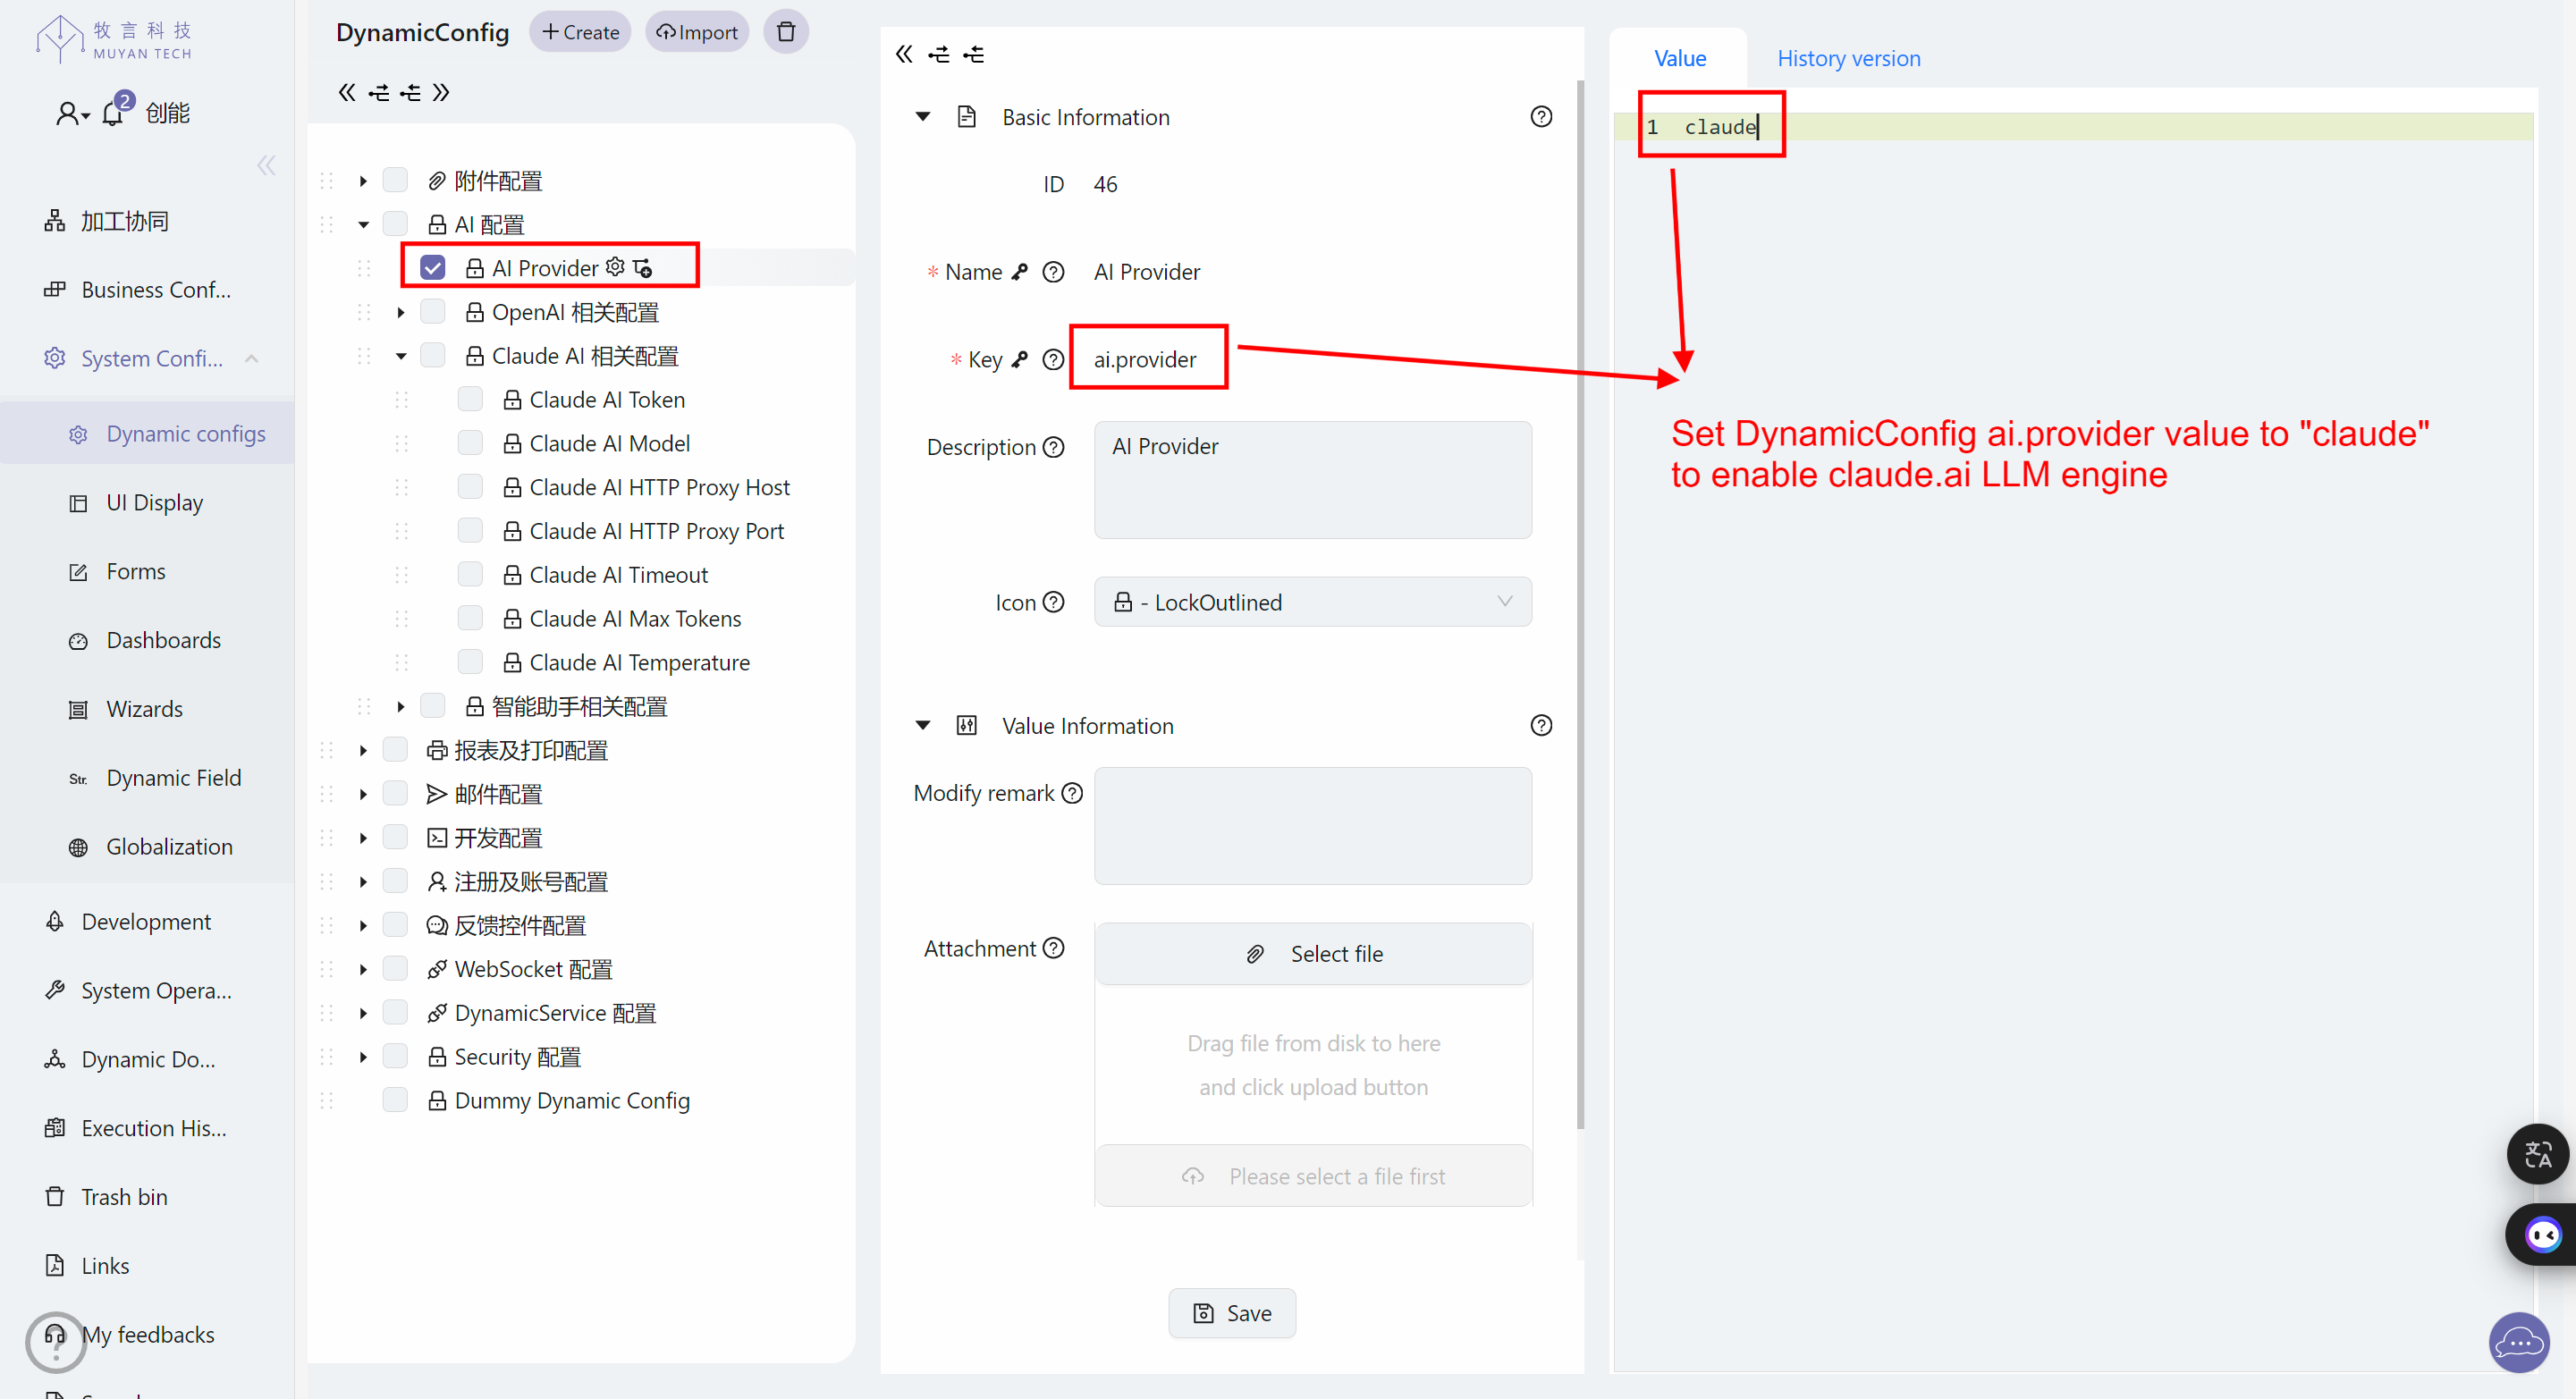
If you wish to use Anthropic's API instead of OpenAI's API for the intelligent assistant and LLM_ENGINE dynamic logic engine, please refer to the following settings:
- Set the ai.provider DynamicConfig to
claude
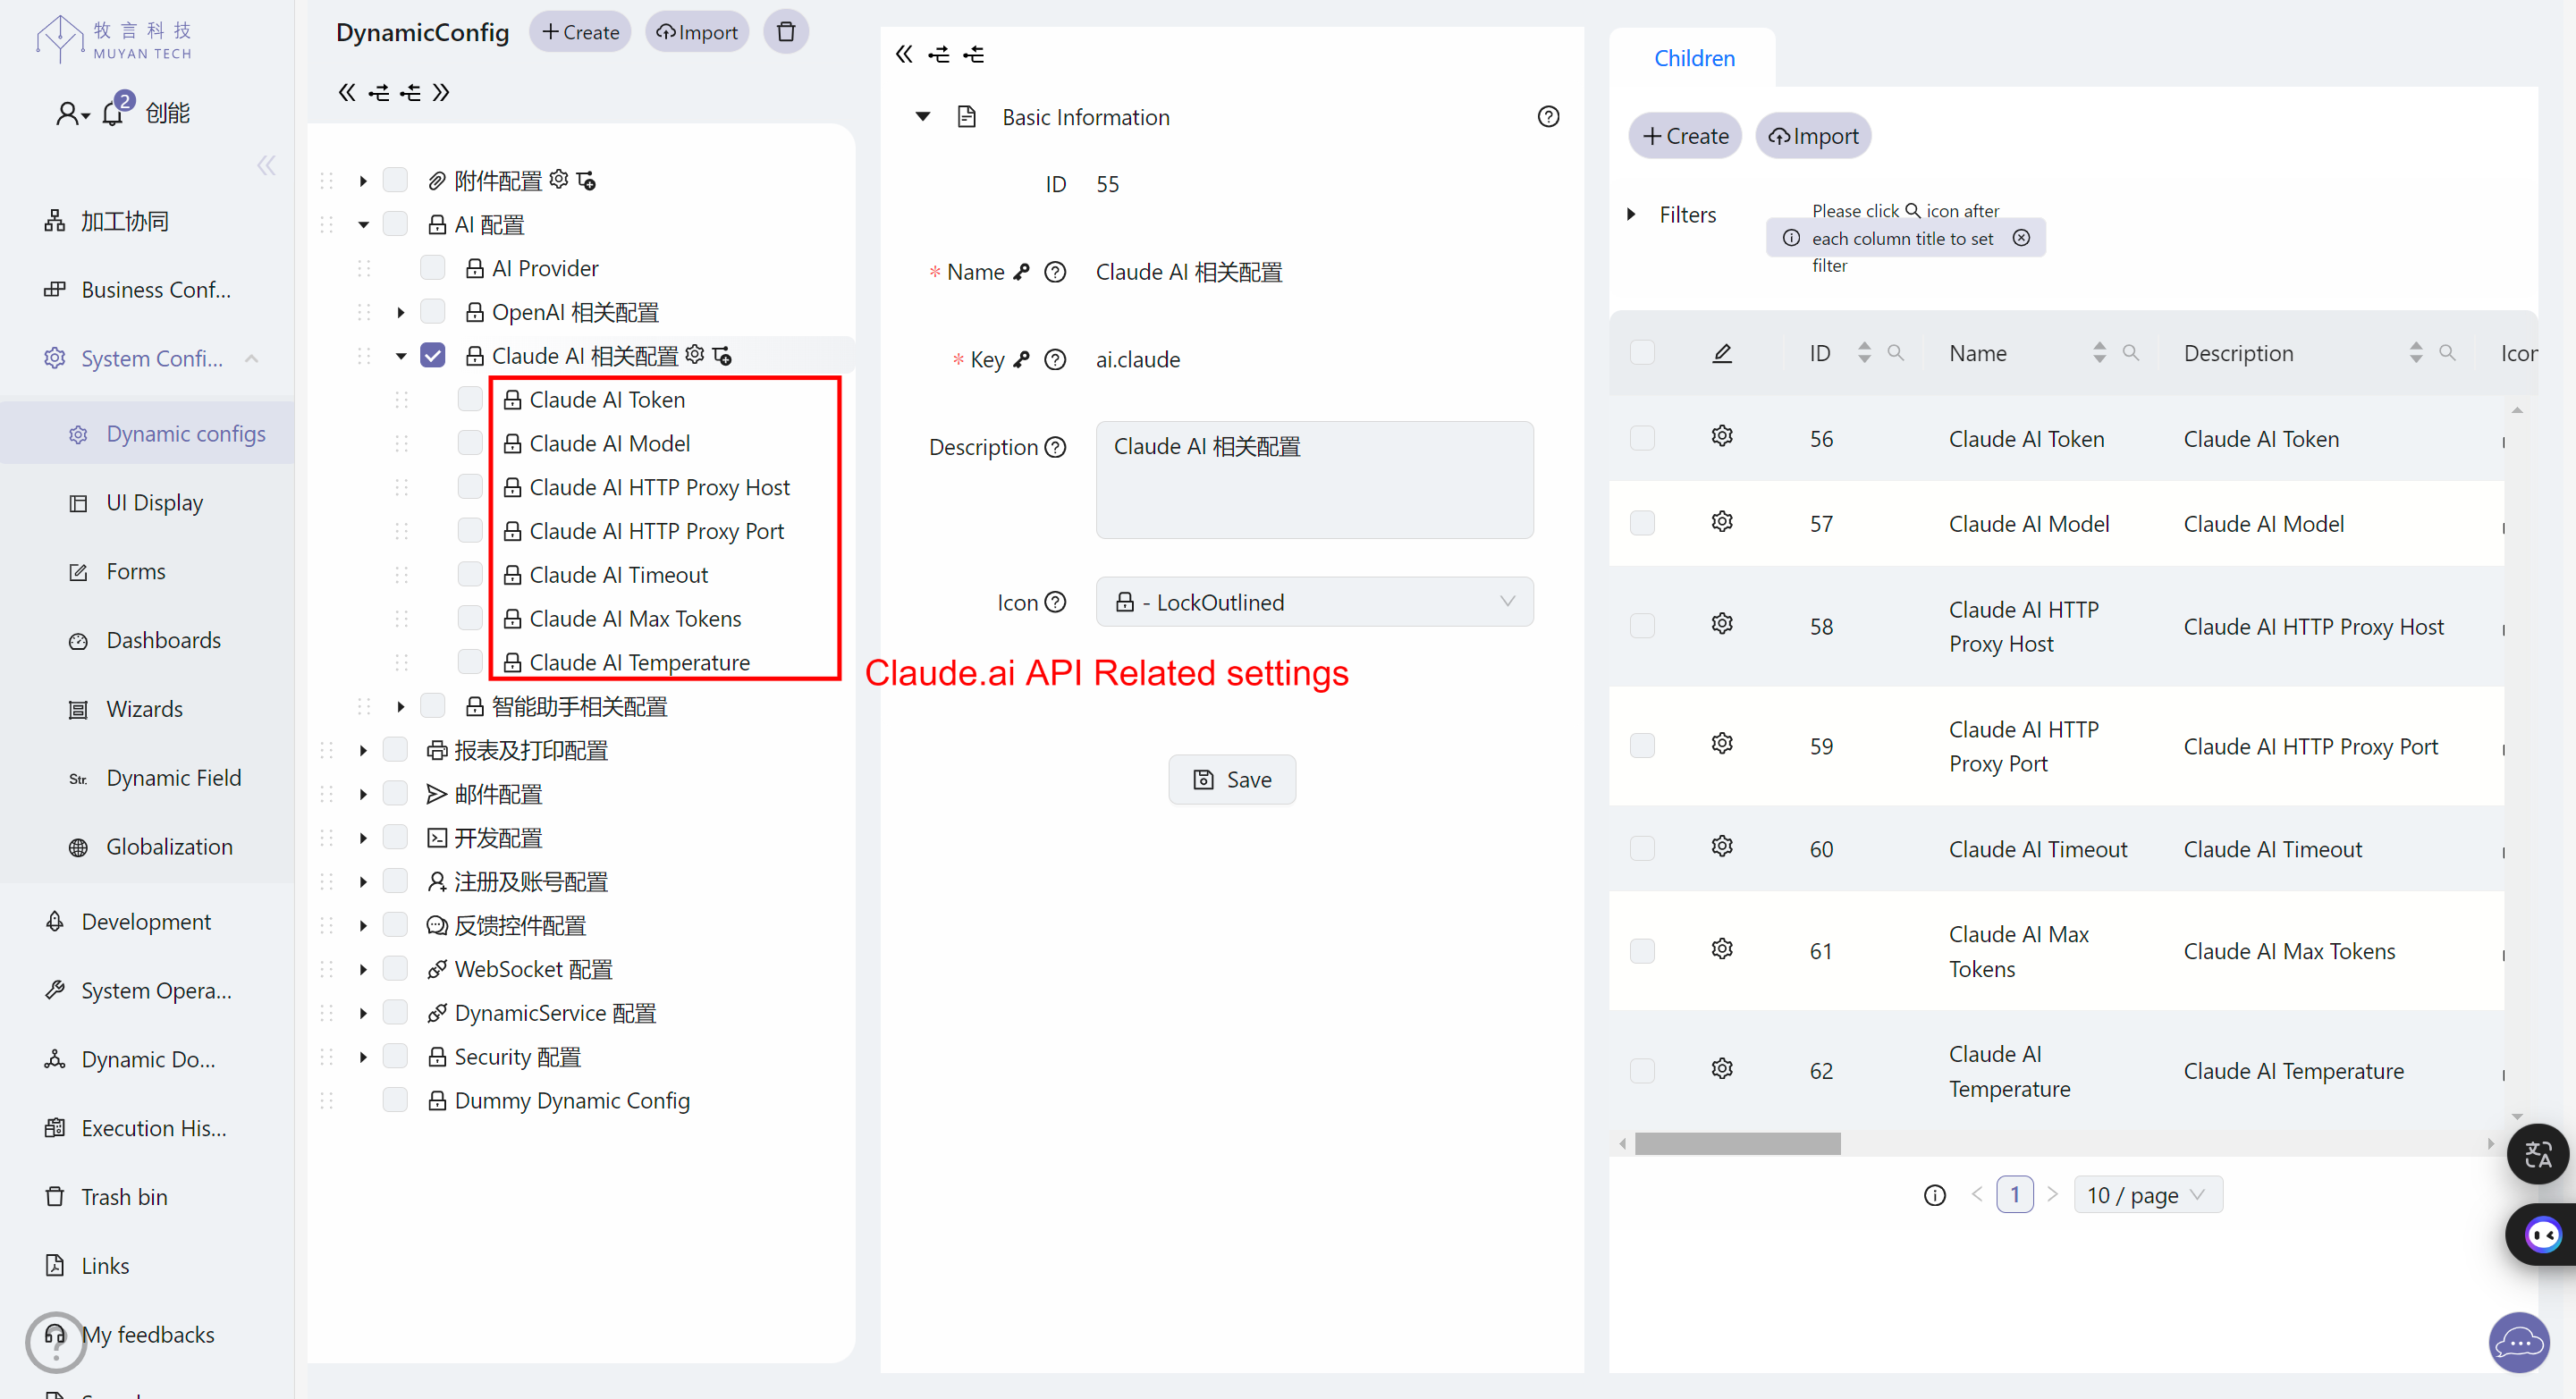
- Set the API-related settings as follows:
# Enable SMTP for Sending Emails
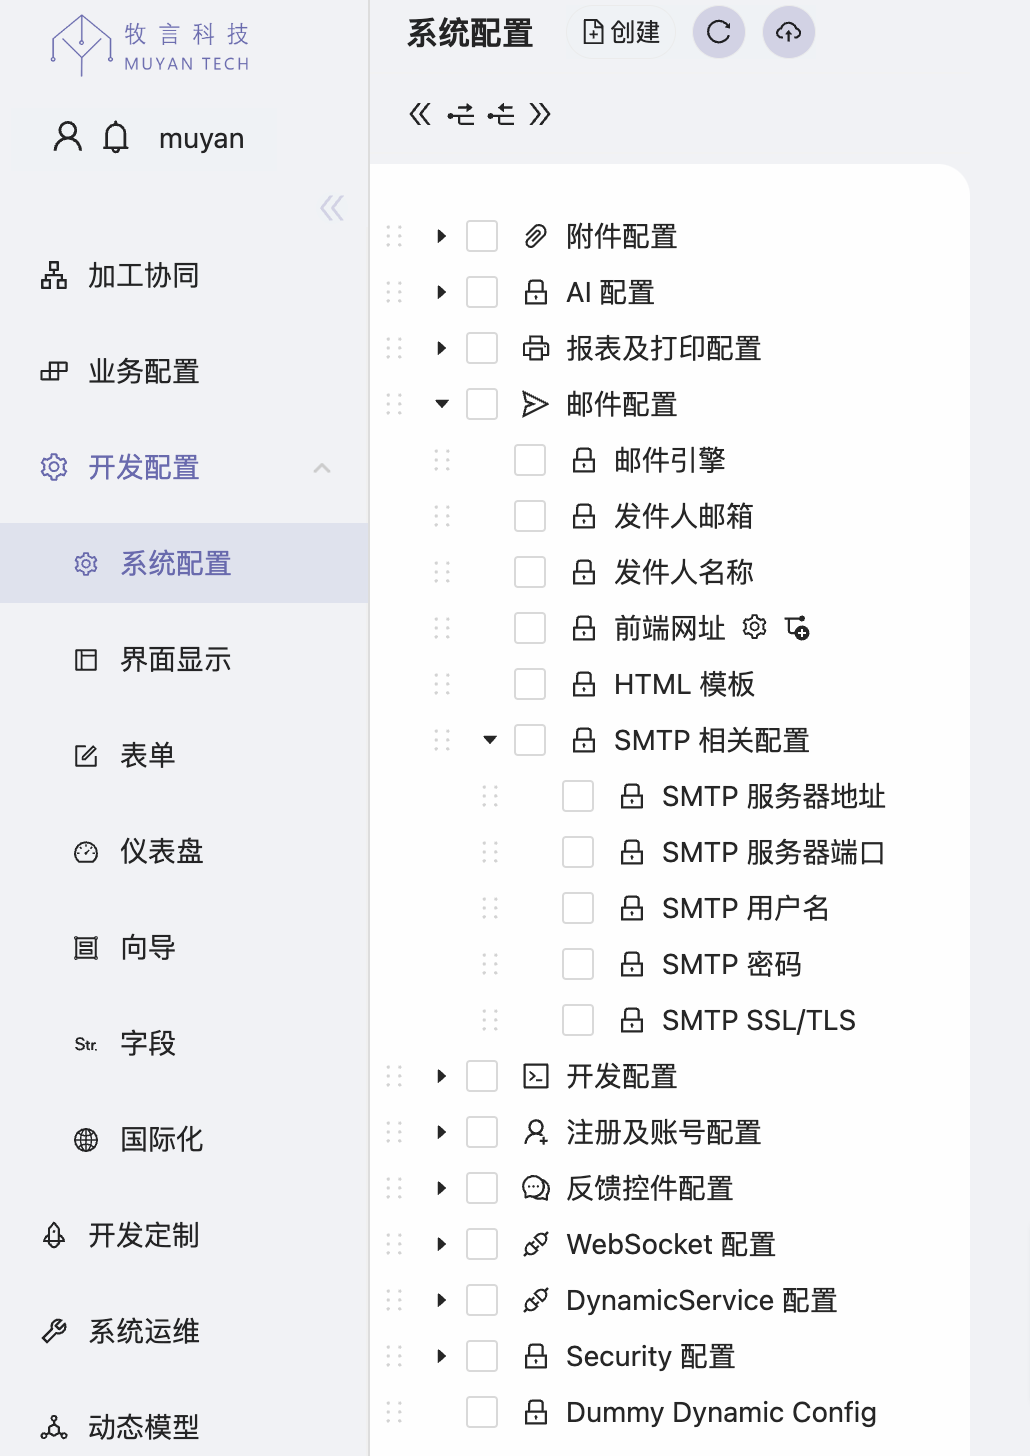
The SMTP email sending related configuration is under the system dynamic configuration
Email Configuration -> SMTP Related Configuration, including SMTP server
address, port, username, password, whether to enable SSL/TLS, etc.
In addition, under Email Configuration -> HTML Template, you can update the
default email template. The email template is saved as an attachment in this
configuration.
# Additional Notes
# Port List
Here's a list of ports for each component:
| Component | Port | Connection Method |
|---|---|---|
| Frontend | 3000 | http://localhost:3000 (opens new window) |
| Backend | 8080 | http://localhost:8080 (opens new window) (accessed through frontend) |
| Backend Debug Port | 5050 | Connect to port 5050 on localhost in IDEA |
| Redis | 6379 | redis-cli |
| PostgreSQL | 5432 | psql -d application -h localhost -p 5432 -U postgres |
| PGAdmin | 5433 | http://localhost:5433 (opens new window) |
# Default Usernames and Passwords
Here's a list of default usernames and passwords for each component or system user:
| Component | Username | Password |
|---|---|---|
| PG Admin | [email protected] | secret |
| Postgres | postgres | password |
| Backend Admin User | [email protected] | password |
| Backend Developer User | [email protected] | password |
Here's the database connection information:
| Username | Password | Database |
|---|---|---|
postgres | password | application |
# Docker Volumes
Here's a list of Docker volume paths for each component:
| Component | Path in Docker | Path on Host | Description |
|---|---|---|---|
| PostgreSQL | /var/lib/postgresql/data | ./runtime/database/data | PostgreSQL data folder |
| PGAdmin | /var/lib/pgadmin | ./runtime/pgadmin/data | PGAdmin data folder |
| PGAdmin | /pgadmin4/config | ./runtime/pgadmin/config | PGAdmin config folder |
| PGAdmin | /var/log/pgadmin | ./runtime/pgadmin/log | PGAdmin log folder |
| PGAdmin | /var/lib/pgadmin/storage/db_muyan.cloud/pgpass | ./runtime/pgadmin/pgpass | PGAdmin pgpass file |
| Backend | /root/workspace | ./server | Backend code workspace |
| Backend | /root/attachments | ./runtime/attachments | Uploaded attachment storage folder |
# Further Reading
For more detailed documentation, troubleshooting tips, and community support, visit:
We're excited to see what you build!